Google+

Translate

20 July 2013

Unreleased SEGA MegaDrive / Genesis Game ... Time Trax -Released..

Old School Game Time..

I've Been wanting to post about this for a while since it was brought to my attention.

But I wanted to give it a a bit of game time before i made a post about it. Also I'm not 100% sure regarding the legalities of this piece of software, and / or It's Distribution but i assume the good folks who got this out to us have had that covered? if not.. oh well.

Regardless, I see no harm in a quick write up on the game, which did see a release back in the day for the Super Nintendo, however the SEGA version was never released... Until Now!

Sadly It's not a Cartridge release, for obvious reasons, so it comes as is, in Binary (.bin) rom format, which should be compatable with almost all of the emulators out there, flash rom carts such as Kirkzz's EverDrive, or if you're that way inclined and tooled up, Flash the .bin to a 1mb rom chip and hack it into a MD/Genesis cart (eg a cheap sports game) to play on the real hardware if you, like me are still rockin' a MegaDrive Console.

Eventually i plan on doing the latter, but currently do not have a rom chip or programmer.

The Good Folk over at http://segaage.com/ have made this release possible, and happen, so a new game for all to enjoy.

Anyway, the game is "Time Trax" a nice little platformer in classic 16bit style, while the graphics are not earth shattering even for back then, the gameplay and music are pretty solid, music is especially good. but that is all subjective so i suggest checking it out for yourself.

Screenshots of the Title Screen and Options, taken by myself using Emulator "Gens/GS R7" on Ubuntu based system 13.04 64bit(almost everything i do is/will be on free and open source software, I'm a big Advocate of free and open source operating systems and applications):
This Seems to be a Different Screen to what is show over on SegaAge

 
Options Screen
The Options screen, has the usual, a music / sound test, Difficulty settings, and 6 different controller settings, this is nice as there is no manual with this release, so set this as you like.


Back Story:
The game does have a back story, you play Captain Darian Lambert, Fugitive Retrieval Section, the Year is 2193 - and theres a whole heap of back story and text which im not going to read right now or go into.

Gameplay:
Basic platforming gameplay, Nothing special here other than the ability to slow down time, this as per the games storyline, is one of Captain Darian Lambert's psychic powers, slowing down the perception of time for other human enemies, however this does not work against machines, this will need to be used to get past certain areas/ obstacles etc. and only lasts for a few seconds at a time, then quickly recharges. Then, the standard jump and attack buttons, you start with a long range electric weapon which is good vs machines, but only stuns human oponents(keep shooting them and they eventually die), for them you need to get up close and beat them up hand to hand, (same button)

As per classic platforming rules, there are secret areas and boxes, barrels and crates will contain items / points / power ups,

Movement and control are all solid, although I've yet to play this on an actual MegaDrive but i dont see there being any issues. there are spike pits to fall in and pipes to shimmy across, ladders to go up and down etc.

 Graphics:
In-game graphics are as to be expected for a 16bit MegaDrive game. how they compare to the SNES version I can't say as i've never played it. Here's some quick gameplay screenshots:

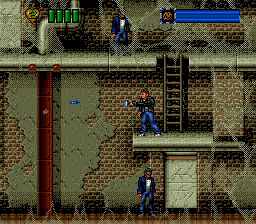
Player standing still with enemies above and below. Note the overlay graphics which can be seen around the edges i think they're meant to be webs, as there's spiders which crawl off them and into the players path, which i thought was a nice touch.
Shooting - not it's more effective to beat up the human enemies up close. at the top left you can see your life meter(the green bars)and the number of lives or "1ups" you have(the heart shape with the "2" in it), on the top right is your time slowing power meter, this will drain as you use your time slowing power but will recharge quickly when not in use.
Shimmying(?) over Spike pit on pipe - every old school platforming veteran knows: "Pipes are our friends" and "spike pits are bad mmmkay"


When you die and fail your mission, the game lets you know how disappointed it is with you by rubbing it in:

And Rightly So! Shame on you!

 
Sound and Music:

Well, Really , it's all there as far as I'm concerned, Cheesy 90's yet catchy, not annoying music, well composed, and decent sounding 16bit tracks, sound effects again are solid and kind of what you would expect. all in all solid


Conclusion:
Solid old school, stop the bad guy, save the world sci fi platformer, good solid gameplay, music and sound are good, graphics nothing special but solid, controls are good and solid too. So I say, Check it out! win win, you got nothing to lose here. Solid all rounder.

Note1:
So far i have only played the first level, due to time constraints, and other goings on, also as I said I'm not sure how this compares to the SNES version.

08 July 2013

Random Update - The Boredom Strikes Back..(router mod/hack)

Boredom Strikes Again!

I Had a few more heatsinks spare and a fan lying around so I've gone n done it again, this time to a BT HomeHub V1.0(I think) Black

On the back of the NetGear mod here: Clicky Clicky

The Hub has the Thompson Speedtouch 7G firmware flashed onto it, so not the BT one.

This was a messy, quick, thrown together job again, just for the hell of it.

Again fan soldered directly to power jack, this router has no on/off switch so its always on while plugged into the mains.

The fan i used this time was a single 12v 0.2amp case/cpu cooling fan. found it in a box of junk.

Hacked a hole in the home hub case, and hot glued the fan on, why? because I'm lazy and it works.

Pictures:

Hole + heatsinks:

Completed and powered on

Yes it's dusty and ugly as all Hell I know but meh it's gonna be hidden out of the way so I wont see it.

This Router had a tendency to lock up/freeze from time to time so I hope this will fix that, I really need to buy some new networking hardware.

That's all for now, probably more waffle coming soon.

07 July 2013

A little something on the side - Project: Botanic Endeavour.

What?

I like to keep busy and have random shit to do, keeps the min occupied and stops me from doing other more random increasingly stupid shit.

So what I've got sitting here in my window, is a plant pot, into which I put some home made compost and some seeds. added some water, and they started growing!

Why? - Why not? Fuck you.

Essential skills for the end of the world / zombie apocalypse, collapse of civilization as we know it.. etc.

So as the story goes, I was making a sandwich, chopping a tomato n decided "I'm gonna plant these seeds n see if I can grow my own tomatoes" so after eating aforementioned sandwich, I set to work googling information about growing plants from seeds, especially tomatoes.

Now you can't just stick the seeds in the soil straight out of the tomato, as they're covered in a protective layer of gooey jelly stuff(yes that is the correct scientific terminology) first you got to get rid of that. one way I found suggested fermenting it off, leaving you with just the seed. Since I'm all about fermentation as per: ye olde meade making of i decided to try that.

I stuck the seeds into a plastic drinks bottle with a little water then sit them in the window for a few days and let nature take it's course, after a few days they were ready, Poured off the water and goo, and dried the seeds with some tissue paper.

Next, I put the seeds inside some tissue paper then put the paper into some small pots (yogurt pots or drinks bottles cut in half) added a little water so the tissue was damp but not swimming, and left them in a closet for a few more days.

Checked on them after a few days and the seeds had sprouted roots, added some more water and waited another day or two and they had leaves, or at least the beginnings of leaves.

Removed the new plants carefully from the tissue paper trying to to break the roots and added them to a pot full of home made compost, which is rought and lumpy kinda stuff but seems to work well.

Here's what they look like now after a few weeks: of just watering roughly once a day...


There are a few other things growing from the compost, I'm not really sure what they are but meh whatever. there's 6 tomato plants growing, i did remove some grass that had started growing I'll leave the other things in there n see what they turn out to be. i did plant some orange seeds in the same pot(for the hell of it) see below:

Out of curiosity I also tried this with orange and lemon seeds not too sure how well this is working yet though. but the lemon seeds didn't work at all they just went all gooey and nasty after a while. However some of the orange seeds did start doing their thing, so I planted them with the tomato seeds;

Of course in my divine wisdom I did not mark or label their positions i think one may be growing but not sure. We'll see how that plays out.

What's Next?

I will probably need to separate the plants into their own pots / growing areas soon they seem to be growing quite fast. Not entirely sure what I'm going to do with them, make up a mini DIY indoor greenhouse or maybe put them outside.

Either way cool lil experiment, I'm pleased with the results so far, so I'll do more updates maybe if I end up making the indoor greenhouse or actually getting some Tomatoes from them. And if the orange seed actually grows.. Time will tell.


05 July 2013

What Happens when i get Bored. (Netgear router cooling mod)

Something non gaming related today, but still nerdy so all good...

OK so, i have a NetGear modem/router, it's not the best but does the job i need it to do. and is a shit lot better than the one i got from my ISP.

Now it previously had overheating issues, dropping connection or locking up completely and needed to be reset at least once a day. So i eventually got pissed off with it and decided to do something. And no, it wasn't buying a new router like a normal person would have.

First, I took some small ram heatsinks off an old graphics card, and put them on the router's chips, this actually helped a lot. so i left it alone for a while. then seen a video and forum post regarding netgear router mods:

heres the video -

I decided to go for some Overkill, because i had the parts lying around, unused. Set to work on my router:

1. Cut honking great rectangular hole in the top casing.
2. Soldered ground and 12v wires to the Power jack pins on the router.
3. Took a HDD cooler (akasa dual 12v fans) popped it on the top over the hole i'd cut(measured to fit of course)
4. connected the ground and 12v wires to the fans.
5. closed it all up and secured the hdd cooler in place with some trusty hot glue, i would have used screws / bolts but didn't have any that would have worked.(eg too long or too fat*thats what she said*)

And here's the end result:


Stuck the NetGear logo back on after i shot the video sorry about quality was using phone camera and sometimes it doesn't like to focus.

Before:

^After^


Final Thoughts:

Overall for a stupid mod that cost nothing and alleviated my boredom for a while, I'm happy, it does what it's meant to do. Whereas most people should be fine just adding the heatsinks which can be found cheap on ebay or wherever i just wanted a lil more oomph.

What would i do differently?

Now as the 12 fans are wired directly to the pins on the power jack, they are always on and always at 100%, they're not really noisy but are audible, so i would maybe find a different point to connect them(after power switch for example) and also perhaps Add a trim pot / variable resistor or on / off switch or both to give a little more control on fan speed (and therefore noise).

but there's plenty of fans going when my main gaming rig is on and it's beside the router so don't really notice when its on. anyway. + headphones so no big deal.

What's Next?

Next, i may give similar treatment to my hacked V1.0 BT homehub as it tends to have similar issues only not as bad.


03 July 2013

NeoGeo MVS 6 Slot Arcade Hardware Repair Part 2, small update

Slow Progress:

Slow progress, waiting, more waiting, ordering parts, ordering supplies and tools. meh! I HATE WAITING!

 Something along the lines of a Star Trek Replicator needs to be invented, would put an end to a lot of waiting. A lot of items i need have to be ordered online, some for them USA or China, for various reasons, mainly being where i live, no "Radioshack" or decent local electronics suppliers. Just one big chain, which do not always have what i need. "Maplin" and can be a bit pricey.

other things have also slowed progress, more important events in life haha pesky life getting in the way of my nerding around.

On to the actual progress:

Area around the leakage has been cleaned and acid neutralized, as per Part 1, i have lifted a number of ICs(chips) from around the Area, a few HD74LS05Ps, a HD74HC32P, the D4990AC calender clock chip, a NEC uPA2003C and the DM74AS244N closest to the battery.

I removed these for three reasons; 1. To make sure the traces that run under the ICs were not corroded / broken, 2. To Clean up any remaining acid / corrosion, and 3. To make sure the chips themselves were not damaged and replace if required.

There was a fair amount of corrosion on the legs of the chips and the solder wasn't great either. so i decided to just cut away the legs from the DM74AS244N and the 74LS05s, the other chips came out with little effort so i cleaned up the legs on them and will try and re use.

I've also replaced a electrolytic capacitor that was right beside the battery, just because i had a few spare from previous projects (Game Gear Recap i think)


So Where i am now: 

What i get when the its all hooked up:

it's actually white not pink, poor lighting and the flash from camera(my phone cam doesn't like to focus well or take pictures of CRT's).

From the information I've got so far it looks like something is stopping the 68000 CPU from firing up, either a broken trace somewhere or a ram issue. or both lol.

Waiting! for some New HD74LS05s and DM74AS244Ns. more solder and some flux as I've ran out / have little left.

I may also order up some SRAM chips but will wait until everything else is in place.

I may also have another Neo Geo board coming my way soon, another multi slot but with a less severe issue, although this is not concrete yet.

I am determined to bring this beast back to life.

So basically this update is a Load of babble 

Finally I would like to thank l_oliveira over on www.assemblergames.com Forum for some useful info and pointers (also great group there, recommended place to check out)

21 June 2013

Ebay Luck. Gaming Related randomness

Well, all i'll say is you can still get a good deal on ebay although getting more and more rare! (although everything on ebay is apparently "RARE!"

Registered Trade Mark.


I was browsing ebay out of pure boredom, and happened across something of interest at an interesting price (cheap! my kind of price) now these normally go for more on ebay.

but i grabbed a Sega Dreamcast for £10, was console only and no modem
the reason i got it was for parts mainly case and motherboard, power supply etc as spares, Anywho. It was listed as "untested spares and repairs"

so i thought Like ol Jack Burton always says: "What the Hell" and went for it.

After a few days, it arrived but i missed the delivery guy. luckily royal mail office isn't too far from me, so the next working day i went up to collect it.

Now when i got it, i tried to take a quick look on the way home. but damn... this thing was well packed. it took brute force teeth and claws to get it open. impressive and commendable packing job! which im not used to from ebay sellers, let alone for a supposedly faulty item.


when i got home, gave it a quick dust and checked inside to make sure nothing was disconnected and all the components were there. they were. all good. connected my cheapo vga box "Game" brand. and stuck in my rather scratched up Virtua Fighter 3TB disc.


Boom! fired up first time, memory battery is dead but they all are by now. so just ok'd the date and time.

that's Via composite video and not VGA

needless to say the DreamCast is no longer going to be used as parts, as it's too good and works perfectly. Bargain! and a nice surprise.

now i did notice an issue, and this was a pain in the arse to fix.

my cheapo VGA box wasn't displaying all colours ( Red Green Blue) it was missing the red, 

so determined i set about fixing it too. as i dont want to pay stupid amount of money for another one.


basically the problem was wear and tear on the connector that goes from the VGA box to the Dreamcast AV port. It's cheap quality crap basically. 

cracked it open, fixed the problem after some frustrating soldering and pin manipulation. got it working like new. now it looks pretty ugly but does the job fine.

here's what it looks like now:

blurry picture i know sorry.

nice green electrical tape and super glue
 holding the connector together

just tape and it's own clips holding the box in one piece.

Last time i got lucky on ebay was when i picked up a Model 1 SEGA Master System, again, supposedly faulty, but worked perfectly when i got it, came with a Joystick and the SEGA Phaser light gun and a MK2 MegaDrive AC adapter.
The only issue is that inside it was missing the metal shielding, this does not have any effect on the system though it's working to this day

Random Ramblings. :-)

NeoGeo MVS 6 Slot Arcade Hardware Repair Part 1.

Thought i'd keep a record of what im doing here and maybe it'll be of some help to someone else who knows.

I have a Neo Geo MVS 6 SLOT (NEO MVH MV6 (6 slot) arcade board to repair

It's had the battery leak but any more than that as of yet i do not know.
The battery is located on the bottom board at the opposite edge from the volume sliders and headphone/ speaker jacks.


It's Huge! but an impressive beast.
Metal shield for the top, Slot Board and then Main board on the bottom.

My first attempt at repair of NeoGeo hardware, so this could go horribly wrong. but hey, i like to jump in at the deep end.

First off, i Stripped it down. some stubborn screws and a bent mount from shipping aside(see pic below for how mount was bent.)
Yes that's a blurry pic, but you can see the board mounts sticking out of the box! lol..

Anyway. i Cleaned the board up, Removed the leaky battery, went over the damaged / leaked acidy area with some baking soda and water solution then cleaned it off with water and dried board throughly.

here's what it looks like now.
Fig 1. Back of bottom board below battery

Fig 2. Top of Bottom Board, Acid Damaged Area
What I need to do is remove the stubborn black sticky foamy gunk so I can take a better look at the traces on the bottom below the battery area. I can see some are damaged.

on the top part, there's plenty of traces which look completely wrote off or very questionable. so alot of work to patch them up.

I may also remove some of the chips in that area and make sure there's no corrosion and they're OK underneath.

The battery was simple to remove just De-solder two pins from the bottom of the board(middle-right of "Fig 1" pic)

That's all so far as i need to stock up on some supplies

Solder, Wire, Flux, etc.

Thoughts So Far?

Big Job! Big Board!  But all being well, achievable i really hope i can bring this board back to life. first of many? prehaps i would like to work on some smaller boards eg 1 2 and 4 slot or dedicated(no slot game built in), and other arcade hardware.